Showing posts with label being green. Show all posts

Tuesday, October 18, 2011

How to Brew Vermicompost Tea

Worm castings

Vermicompost tea seems to be kind of magical. It is high in microbial activity. We brewed large batches of it last year at the organic farm I interned at and both watered with it and used it as a foliar spray on our seedlings in the greenhouse. It effectively killed an infestation of insects that were attacking our tomatillo seedlings. So now, when I see that plants in my garden are being eaten by insects, or just don't look so well, I look to brewing vermicompost tea as a potential solution.


What you'll need:

1 cup or so of worm castings
5 gallon bucket of water
Cheese cloth or permeable material to make a tea bag with
Elastics or string
Fish pump with tubing

Fill the 5 gallon bucket with water. If not using rain water, let the water sit for 48 hours so the chlorine and other stuff from city water can evaporate before you brew your tea.

Place your worm castings on a doubled over piece of cheese cloth and wrap to make a kind of worm poo tea bag. Use elastics to tie off the ends securely.

I tied my tea bag to the handle of the bucket so it rested half way inside the bucket instead of sitting on the bottom, for optimal steeping.


I used an aquarium bubbler and attached it to the end of the fish pump tube and set it in the bucket of water. Plug in the pump and let it bubble for 24 hours. Some people add a little molasses to increase microbial activity but I have yet to try this.


Use the vermicompost tea within 24 hours after the brewing is complete, as it is an active solution.

Using the vermicompost tea as a foliar spray on basil that was being eaten by insects

Thursday, March 24, 2011

Hugelkultur

I learned about hugelkultur, a german word meaning "mound culture", in Toby Hemenway's book "Gaia's Garden: A Guide to Home-scale Permaculture."

Hugelkultur involves burying dampened logs, branches and twigs underneath layers of compostable materials, leaves, finished compost and topsoil. The resulting mound can be planted directly into.

This method offers several benefits. The wood holds a lot of moisture, accessible to plant roots for long periods of time, thus watering will be required less frequently. The logs, branches and layers of compostable materials offer habitat for soil organisms, and the slow decomposition of the wood will create healthy and fertile soil. It is a version of composting in place (like sheet mulch).

It is important to include nitrogen rich materials in the layers on top of the logs, and shoved inbetween them, since the decomposition of the woody materials will use a lot of nitrogen in the process. A good carbon/nitrogen balance can be maintained by including nitrogen rich kitchen scraps, fresh leaves, etc into the mound's layers. Also planting nitrogen fixing legumes (peas, beans) in the hugelkultur bed will also add nitrogen into the soil.

I decided to try it out in a specific area of my backyard garden. I placed the mound in front of a south facing fence. The hugelkultur bed will serve many purposes here. It will allow me to grow climbing varieties of plants up trellises along the fence, some of which prefer to be grown in mounds (winter squash). It will provide long term fertility to the soil in this area of the garden as the logs and branches decompose. It will improve water retention in the soil in this area. It's physical location allows the mound to act as a physical barrier preventing soil and water runoff into my neighbors backyard, due to the existing slope in that direction.

This is a good example of the permaculture principle of stacking functions - getting many yields from one element of the garden system. The hugelkultur mound provides space to grow climbing and mound varieties of vegetables by providing a niche for them, it enhances the main space in my yard where I can garden vertically, it improves water retention, soil quality, and prevents erosion. It will serve multiple functions in my garden.

Wooden debris at the side of my house becomes a resource for a hugelkultur bed


The finished mound. Approx 4 ft x 2 ft, 1.5 ft high.
Layers used include: logs, branches, twigs, sage plant clippings, kitchen scraps, peat moss, leaves, finished compost, and topsoil.

I plan to plant 1 winter squash (Delicata) and scarlet runner beans closer to the fence side of the mound, and 1 or 2 summer squash closer to the front of the mound. The winter squash and runner beans will climb the trellis and fence, the beans will fix nitrogen into the soil, and the large leaves of the summer squash will work as a living mulch to suppress weeds. I am excited to see how the bed evolves over the season and beyond.

Friday, February 11, 2011

Sprouting Sprouts

My sprout growing device resembles a tiny greenhouse with a mesh screen at the bottom. I got it from Tony Hornick. You can sprout in mason jars with screen, but I like how sprouts can be grown to have leafy green tops using this system.

I have mung and adzuki beans, and green lentils to sprout.

Below is a photo-documentation of the sprouting of mung beans over the course of about 7 days.


3 tablespoons of mung beans and just enough water so it's touching the seeds.


Water must be replaced and beans rinsed every 12 hours to discard of the 'afterbirth'


Sprouts are delicious on their own, or in stir fries and other dishes. They're super nutritious and a great way to get live green food during winter months!

C.R.A.F.T. internship experience

It's been over a year since I lasted posted here on my blog. And quite a year it has been.

My interest in learning more about organic agriculture led me to doing an internship through the C.R.A.F.T. (Collaborative Regional Alliance for Farmer Training) network of organic farms in Ontario. I lived and worked on two very different farms from May through to November 2010.

If you have an interest in learning more about organic farming I strongly recommend this experience of becoming an intern. Working and living the farm life alongside like-minded folks is a rewarding experience in many ways. Many skills can be learned and honed doing a CRAFT internship. Not all farms are the same, so contact them and ask plenty of questions about what it's like to work there and what you can expect to learn. The organizational structure and goals of each farm, what they have (animals and structures e.g. greenhouses), what they grow, practices used, working conditions and hours expected to work, living arrangements, stipend, and educational component offered will be different on each farm.
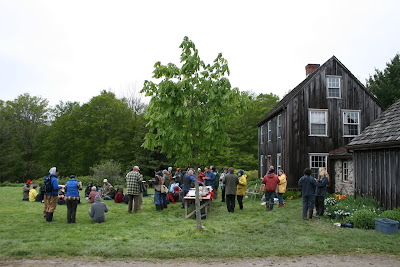
Here are the interns from many different farms at our first CRAFT day. Held once monthly, interns from all farms have an opportunity to tour another CRAFT farm, learn about a specific farming related topic through guest speakers or presentations, have a fabulous potluck lunch and pitch in a little work for that farm. With so many hands a lot can be done in little time!

Many of the farms in the C.R.A.F.T. network have CSA (Community Supported/Shared Agriculture) programs. Plan B Organic Farms, a family run farm, is one of the largest CSAs in Canada. Working there gave me insights into the operation of a very large organic farm/CSA operation. Their model is different from some farms, in that they work with many other local organic farms and distributors in order to include a wide array of vegetables and fruits to their share members, not all always grown on their farm. Share boxes were delivered to urban centres (mainly Toronto and Burlington), either to individual houses or at depots (for example one house in a neighborhood of many who purchased shares would receive them all on their porch for that area.)

Fields at this farm were large and required a lot of focused work in planting, weeding, and harvesting. Produce was also sold at a few farmers' markets in Toronto. Running these farmers' market stalls were some of my favourite experiences as talking with people and seeing their joy in the produce we grew fueled my passion for the work I was doing. I learned a lot from direct experience on this farm and asking questions of the more experienced people around me, of which there were many.

Compost tea is shown being brewed here amongst the seedlings.

A different model is used at Ignatius Organic Farm for their CSA and intern program. Members come to the farm and pick up their shares themselves in the farm store. The farm does not do any farmers' markets. This farm is very education focused and makes a concerted effort to know what the learning objectives of interns are and how they can be achieved. It runs a structured intern program where regular field trips and work shops are organized for interns as well. A huge variety of crops are grown on this farm's acreage and I really enjoyed learning how to grow and harvest such a wide variety of vegetables.

We visit Little City Farm in Kitchener, ON for a seed saving workshop.

On both CRAFT farms I interned at I found a communal approach to working, living, and learning was essential; sharing knowledge, sharing ideas, sharing food, sharing the work load. The people I met during my time this growing season are likely the most valuable thing I have taken away from the experience; truly kind and loving people with a passion for growing healthy food and creating sustainable food systems in our communities.

Wednesday, December 23, 2009

Death + Life: New Year Comes

I will admit I have been neglecting my worm bin for the past 4 months.
They (most anyway) are still alive down there.
I let the newspaper almost dry out.
I failed to feed them regularly.
I mostly just neglected them completely.
Poor worms. This just attests to their ability to survive and endure poor living conditions.
But this will all change soon.
With the new year comes an opportunity for me to take better care of my worms, since my living situation will be different. For the first time in my life I will be living alone and my worms will keep me company. Things will change. Writing this makes it so.

Other posts/projects to come:
Sprouting!

Yes, I purchased a sprouter at the Vegetarian Food Food Fair in Toronto this summer.
Check out Tony Hornick's website. He's got lots of useful information about sprouting your own seeds and the health benefits of eating them.

I will photo document the process of sprouting my own healthy seeds this January 2010.

Cheap food and Tony says they're chalk full of nutrients so eat 'em up!

Monday, April 27, 2009

Moving On

I'm moving to a new apartment, one without a balcony, so I decided to "downgrade" my vermicomposter into a smaller sized bin and sell my original big bin including all of its contents on craigslist. It was weird saying goodbye to my bin as I put a lot of work into it, and had a connection to it. I don't really have a use for the vermicompost inside the bin anymore since I will no longer have a balcony garden. I still want to be able to compost year round, so I've opted for a smaller under-the-kitchen-sink size bin.
But my bin went to a good home and you can follow its journey on this lady's blog here. I'm sure the vermicompost will be put to good use in her garden, and the worms will do a wonderful job eating her family's kitchen waste. Oh boy, bin, you sure do get around!
So, before I sold the bin I made a much smaller worm bin and put a few worms in it. This is a photo of it above. Unfortunately all of the smaller sized plastic bins I could find at Canadian Tire were translucent. I want the bin to be able to fit under my kitchen sink nicely so I opted to buy this small clear plastic bin and cover the whole of the exterior with duct tape to make it opaque, since worms do not like light.
I drilled many ventilation holes in the lid, bottom and sides of the worm bin, just as with my original vermicomposter. Duct tape holds screen in place over top of the holes to ensure nothing escapes.
A few days prior to introducing the worms I shredded up some old newspapers, moistened them down in a large recycling bag and let them sit and fester. The worms like materials that have festered as they're easier for them to start breaking down. I added a handful of soil and some crushed eggshells to the bedding mix. Then I added the worms to their new home!
A couple of days after I let the worms settle in to their new home I fed them some vegetable scraps.

Beautiful stripy red worms!

Wednesday, January 28, 2009

Mold in the Vermicomposting Bin

I've noticed various molds growing on the bedding of my worm bin since I started it. I've never been too worried about them as I figured they were part of the decomposition process. I have found some interesting (to say the least) mold formations growing out of the ventilation holes in the side of my bin since it's come indoors for the winter. After reading this article I found out that it might be from feeding my bin too much. I was worried my worms were not getting enough to eat so I was a little overzealous the last time I fed. I'm going to stick to the 1 to every 2 weeks I've been feeding them, since that seems to work best for my bin. When I feed it's what I feel is a good sized bowl full of scraps. I keep the scraps in a container in my fridge so they can break down a little prior to being added to my bin (the worms will eat them faster this way). I've been wiping down my bin frequently to prevent the mold from reoccuring, and added more fresh moist newspaper bedding on top. If the mold comes again I will take a picture of it.

http://www.allthingsorganic.com/How_To/12.asp - Read this article for great information on all of the other wonderful creatures living in your bin, how to cope, deal, and just realize that they're your friends too.

Sunday, January 4, 2009

Worm Bin: Winter Update

It is now January and my worm bin has been living indoors for 2-3 months now. The harvest method I tried which relied on the worms migrating from one side of the bin to the other (see previous post) has not been successful. I've checked the old, casting-rich side of the bin several times and it is still quite packed with red worms throughout it. It is disappointing that the worms did not move.
I have decided to try to get the bin through Winter until I can move it back out onto my balcony where I will do another harvest by sorting. I feel bad letting the worms live in their own poo but I'd prefer not to harvest by a pile and sort method inside my small apartment with 2 cats and a dog in poor winter sunlight. I have been topping up the bedding in my bin around every 2 weeks as it shrinks down quickly and I want to make sure they have enough fresh bedding available. The moisture level of the bin's contents is good and is maintaining itself nicely without any spraying from me. I've been feeding weekly.
During the winter I do not compost as much as during the summer, when I compost everything that can be composted. Since I am not using the outdoor community composter during the Winter for larger compostables I don't feel like chopping up or those that I avoid putting in my worm bin, I end up throwing some of it in the garbage. It does still feel good though being able to compost the majority of food waste and scraps from my kitchen in my worm bin.

Wednesday, November 5, 2008

Vermicomposting Bin Moves Indoors & New Harvest Method Experiment

I have not posted in a while. The balcony garden slowly died as summer ended. We got many tasty cherry tomatoes. The pomodoros did not ripen in time. The bean plant produced 2 strange beans which I let go to seed. Growing vegetables in containers is challenging so I think I'll go crazy with flowers next year.

The vermicomposting bin has been a success. As the temperatures cooled off (lows below 4 degrees celsius), I brought the bin inside. It has found a place underneath a table my cats eat their food on in the kitchen.
3 months have passed since I first harvested the bin of its castings. I decided to try a different method than last time by moving the bin's contents over to one side, filling the empty half of the bin with new bedding (moistened shredded newspaper and hay that set for a few weeks in a plastic bag), and feeding the worms with fresh veggie scraps on the new bedding side in the hopes the worms will migrate over to the fresh side of the bin allowing me to harvest the castings.
I checked the casting-rich side a few days ago (I put in the new bedding on Oct 23rd) and there were still a lot of worms throughout. Hopefully they will move over eventually, if not I will have to harvest another way.

Tuesday, July 22, 2008

Making Vermicompost Tea

Items used:
Vermicompost
Large bottle
Cheese cloth
Bit of hemp string
Elastics
Water (allowed to sit for at least 24 hrs)
Stick

A piece of cheese cloth, doubled over works well as the tea bag. Scoop in some vermicompost. I didn't follow any ratios, just guessed as to a good amount for the size of the bottle used. This elongated shape fit inside the bottle well.


Roll it up


Tie it off with elastics at each end and some string to ensure the vermicompost doesn't all spill out in the water. Pop that baby into the bottle filled with water that's been sitting for a while to get rid of any chlorine.

Add a stick for easy lifting and jostling of the tea bag. Some sites I read call for aeration, but I'm no professional and think stirring it frequently will be good enough. You can use a fish pump for aeration if you have one. Here is the vermicompost tea after steeping for 24 hours:
I think I'll let it sit for another few days and then water my indoor plants with it.

Vermicompost: Storing & Using on the Balcony Garden


We used our worm compost on all of the plants on our balcony garden by spreading it around the topsoil. We are making a vermicompost tea solution to water our indoor plants with.
Once I had obtained my vermicompost I had to deal with the issue of how to store it. I did a bit of online research and what I read in this helpful blog post is that if you have vermicompost (a mix of worm castings, partially decomposed bedding material and other stuff from your bin) then it should be stored in a container that is not air tight. The reason is that all of that extra material will continue breaking down and if there's no ventilation it could be really smelly and foul. This article also suggests that you first dry out your vermicompost so it's not too wet before putting it in a container. If you have vermicastings (only worm castings, ie you've taken/sifted out all of the other matter) then it is best to store this in an air tight container.
I know from looking at what I harvested from my bin that I do not have pure castings, although they compose the majority of my harvest's contents. There are still remnants of hay and newspaper that were on their way to being broken down completely. It is not wet, but just damp. I figure I will just use a plastic tupper ware container and punch some holes in the lid to store my vermicompost in.
I think the addition of the worm castings to our potted plants is already helping them and am noticing that they are retaining moisture better, requiring less frequent watering (although it could just be the humid weather we're having).
We tightened in our plants, bringing the marigolds off the rails closer to our tomato and other plants in the hopes that their pest repelling properties will help. There are no longer aphids on anything on the table (below), plus the ladybugs are kicking ass on the morning glory vine on the wall. What remains in terms of edible crops are 5 tomato plants (3 cherry, 2 pomodoro), spinach I planted a few weeks ago (enjoys cooler weather than this), garlic chives, mixed herbs, and the pole beans (haven't produced any beans yet - have been spritzing with water). Here's a few pictures of our garden these days:


The blue variety of Morning Glory I planted this year (above) and an awesome show of flowers this morning (below)

The first flowers on the tomatoes we started from seed! (above)
A wasp (?) on the bean plant (below)

Thursday, July 17, 2008

Ladybugs to the Rescue

Earlier I posted about aphids entering my balcony garden. They affected the lettuce (which we removed), and were spreading to the tomatoes. We then discovered them on the morning glory vines. I had submitted to defeat figuring there was too much vine for them to eat it all, but lo and behold, nature provided its own solution with the sudden appearance of ladybug larvae, which eat aphids! They are crawling all over the morning glory, like guardians of the vine. A little ecosystem in itself, the balcony garden finds its balance. This also gets me thinking about how balcony gardens/rooftop gardens may seem removed from nature below, but they are just as subject to its forces as more traditional ground level gardens.

Ladybug in larval stage on my Morning Glory plant